COLOURFUL ゆい


Yui's DIY Classroom
Preface :-The purpose of Yui's classroom ist to demostrate the different techniques to tinker beautiful decoration and artwork with our tinkering leveled clay polymer. Demostrations will include not only the most basic techniques but also complicated ways to finish certain artwork.
Ideas from Yui, demo by Yui's mom, eventually pa.
Basic Techniques
Moulding Tools
1. Soft silicon form
Using soft silicon form for clay polymer moulding is possible, however, could be challenging. Namely, The soft silicon form changes its conformation continuously when you press clay polymer into the form. To have a good art work, consistently filling clay polymer in the form is indispensible!! To have a glossy surface on the art work, avoid water and air between the form and clay polymer is important. Drying with hair drier to eliminate water droplet on clay polymer is helpful.


2. Hard ruler form
Using hard ruler form for clay polymer moulding is simple for small items.
DIY Extreme Glowing in the dark little star
(1) Simply use a ruler containing a drawing form of a little star. (2) Soften the glow in the dark clay polymer in hot water and fill it in the little star form. (3) Cool down and then the clay polymer little star can be simply removed. Then you can do extreme glowing in the dark little star by yourself and do not need to buy it at Donna Polymer store in eBay.de To have a glossy surface on the art work, avoid water and air between the form and clay polymer is important. Drying with hair drier to eliminate water droplet on clay polymer is helpful.


Basic by Hand Techniques
using simple geometry shapes (very suitable for kids!)
Probably the most simple way to use clay polymer for sculpting, also very easy for kids.
Sculpting with clay poylmer is also feasible utilising some very simple geometry shapes such as round, oval, triangle... When not yet completely cooled, different clay polymer parts can be automatically connected once they getting in touch with each other. This is something special for clay polymer. Glue is not needed!!
The end product has already its surface glossy and sanding, polishing and varnishing are not always necessary.
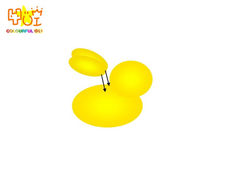
The Little Yellow Duck
This is my first attempt and took me around 10 minutes, out of my expection! The clay polymer is so easy-handling
How was it done?
Prepare all geometry shapes needed and then step-by-step connect them together so long the shape has not yet completely cooled. The sculpting finished as all clay polymer completely cooled:
 |  |  |
|---|---|---|
 |  |  |
The Ladybug
This attempt took me a little bit longer due to the tiny black points. Still clay polymer is undoubfully easy handling even to make such small points (of course edding is a simple alternative).
How was it done?
Prepare all geometry shapes needed. Press technique: gently press the body part until it becomes somehow flat. Then, step-by-step connect them together so long the shape has not yet completely cooled. The sculpting finished as all clay polymer completely cooled:
 |  |  |
|---|---|---|
 |  |  |
The Mushroom
Also, the white points are most time consuming. Still clay polymer is undoubfully easy handling even to make such small points (of course edding is a simple alternative).
How was it done?
Prepare all geometry shapes needed. Again, press technique: gently press the cap part until it becomes somehow flat. Then, step-by-step connect them together so long the shape has not yet completely cooled. The sculpting finished as all clay polymer completely cooled:
 |  |  |
|---|---|---|
 |  |  |
The Snowman
The major difficulty to make a snow man is due to the connection. Keep the clay polymer warm then they can conntect to each other automatically without any glue.
How was it done?
Prepare all geometry shapes needed.and step-by-step connect them together so long the shape has not yet completely cooled. The sculpting finished as all clay polymer completely cooled:
 |  |  |
|---|---|---|
 |  |  |
The Little Seal
Here a new technique will in use, namely using scissors! Using glow in the dark clay polymer, the seal will become very special.
How was it done?
Prepare all geometry shapes needed and give a cut with scissors to form the tail. Then, step-by-step connect them together so long the shape has not yet completely cooled. The sculpting finished as all clay polymer completely cooled:
 |  |  |
|---|---|---|
 |  |  |
The Owl Gowing in the Dark
Using glow in the dark clay polymer, the owl will become very special.
How was it done?
Prepare all geometry shapes needed and then, step-by-step connect them together so long the shape has not yet completely cooled. The sculpting finished as all clay polymer completely cooled:
 |  |  |
|---|---|---|
 |  |  |
Sunflower
Vincent van Gogh is my idol. I really like his pictures. Inspired by him, I made this sunflower. New: cutting technique
How was it done?
Prepare all geometry shapes needed and then cut the central piece of sunflow with knof slightly to imitate the natural one. Thereafter, step-by-step connect them together so long the shape has not yet completely cooled. The sculpting finished as all clay polymer completely cooled:
 |  |  |
|---|---|---|
 |  |  |
More? coming soon ...


